

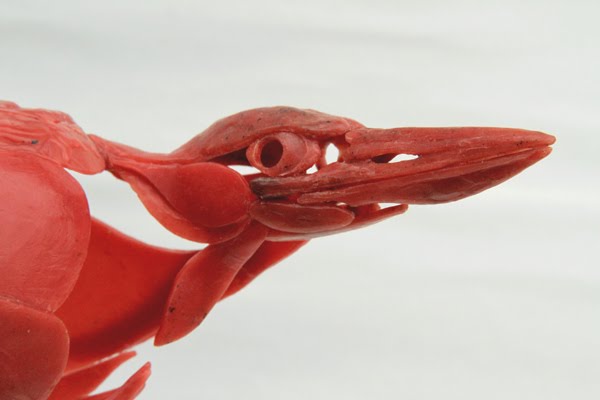

Ixobrychus minutus
Molding in wax, real size of the bird
This is the beginning of the three-dimensional process of the work. The main part (the bird) has been molded in wax. Once the piece is cast, it will be assembled on a metallic structure.


Sketches of Ixobrychus minutus
Graphite pencil on paper, 24 x 48 cm.
The beginning of every sculptoric project is based on drawing.
On the left upper corner of the second page of sketches of Ixobrychus minutus there is an outline of the assembling of the piece.

Charadrius alexandrinus
Molding in wax, real size of the bird


Sketches of Charadrius alexandrinus
Graphite pencil on paper, 24 x 48 cm.
On the upper side of the first page of sketches of Charadrius alexandrinus,it is shown the assembling of the piece.

Once the pieces are molded, we go to construct the casting tree, very important for the flow of molten metal.


These are the three casting tress of the pieces I prepared.

Before bathing them with plaster blend to make the mould, they are covered with shellac. This layer is very important, as it sticks the plaster blend to the piece.


Process of coating in plaster blend (first layers: colloidal sillica+ tabular alumina = plaster blend + talc to soften + powdered graphite used as antioxidant)


Humidity was a big problem. It was raining the whole week. Our concern, especially Andrés´s, was evident. The different layers didn´t dry. The time needed multiplied by three.

The rest of the layers are of plaster blend with sand (two of fine grain molochite + another one of medium grain molochite and a last layer of medium grain, too, to strenghthen it after removing the wax)

In order to avoid the decanting of the plaster blend, which happens fast, you have to constantly move it. For that, we have used an alectric drill with a spread-eagle rod. In addition, Manolito "Perú", is making a mixer with the engine and the ball bearing of a broken washing machine, which I´ll show when I use it.

Our improvised drying tunnel: made with two doors, a school table, and two pieces of sheet. Air was supplied by an old fan.

Preparing the removing wax hood. The edge of the hood was reinforced with plaster blend, fiberglass and medium grain sand.

Andrés and Manolito "Perú", a great and professional blacksmith, put the final touches to the hood, placing some stands for the gas welding torches.


While Andrés, Lolita And Manolito were preparing the hood, I was cutting off the drainage of the moulds with a diamond radial disc.


Removing wax: This is a team work; the person in charge of putting and moving the pieces from the heat is the one who leads the rest. When he says, one person rises the hood at the same time that the two other ones are shutting off the gas welding torches to turn the flames down in order to be able to manipulate the pieces. Lolita and me placed the pieces into the hood. Andrés, more skilled, was in charge of raising the hood and, Lolita and me (rotating) and David operated the gas welding torches.
In the second picture you can see the structure of the removing wax hood that Manolito "Perú" has made for me. It can be completely dismantled and it is easily transported.

The only incident we had was when we were removing the wax from my Ixobrychus. Its instability provoked its fall and it leant on the hood; I had to replace it with the pliers (picture) and, unfortunately, when we moved it from the hood, it fell again and some parts were broken.

Ceramics shell moulds after removing wax. You can see here my broken Ixobrychus. There is no problem as this material is easy to be repaired using strong glue, some pieces of polystyrene and fiberglass together with the plastic blend and sand.
For my next large-format work, I´ll make sure to make a bigger coating container in order to make it more stable.

Before melting the bronze, you have to close the drainages we opened to remove the wax correctly. Out of security, we put steel fixing wire covered with fiberglass to strenghthen the joint between the piece and the crucible.

Inside of the kiln when placing into one of the pieces.

Here I show the kiln we made. As I said before, we recycled the tub of an old washing-machine prepared with some bricks and refractory layer. We used a gas welding torch to provide the approximate 1300ºC needed to melt bronze.
Andrés puts an iron bar into the crucible to check the fluidity of the metal.

Lolita was the most courageous. She was the first in melting one of her works.

Then Andrés.

And, on Saturday evening, and led by well-meaning envy provoked by the good results of my mates, I decided to melt my Charadrius alexandrinus.
We didn´t have more time in this intense week of work and there are still some pieces to be melt, moulds to be repaired and removing the ceramics shell from the pieces already melted.
I promise a future post with the first three works we finished without ceramics shell( Lolita´s snakes, Andrés´s small axe and my Charadrius). We didn´t have time to take more photographs because we had to tidy up and clean the workshop. It was 23.30h of our last day when we "finished".


One of the big contributions was that of David´s, a fantastic assistant. He was in charge of one of the torches. The valve he operated was at a three-metre distance from the hood, a completely safe place. He also helped us during the process and was always receptive; as a result of it, Yolanda could be our "personal press photographer" and she took most of the photos I show.


To end, my most sincere thanks to Yolanda and David for putting up with such "holidays" with me, to my sister and brother-in-law for housing us, and to Manolito "Perú" for lending us his workshop and collaboration and, above all, to Lolita and Andrés for being there, shoulder to shoulder, in the whole process. A big hug for all of them.